Basics of VT-x and VMX Root Operation
The long journey of implementing the Ymir Kernel has finally reached a good stopping point, and it's time to move on to developing the VMM part. This chapter starts by explaining the fundamental concepts of VT-x, with the goal of transitioning into VMX Root Operation, a special mode used for VMMs.
important
The source code for this chapter is in whiz-vmm-vmx_root branch.
Table of Contents
- Overview of VMM
- Checking VMX Support
- vCPU
- Transition to VMX Operation
- Verifying Transition into VMX Root Operation
- Summary
Overview of VMM
Let's begin by reviewing some fundamental concepts and terminology related to hypervisors. From here on, we refer to software like Ymir, which runs on bare metal and has full control over CPUs and external resources, as a VMM: Virtual-Machine Monitor (hypervisor). Software that runs on top of a VMM - executing directly on the CPU but with its access to resources virtualized by a VMM - is referred to as a guest.
Intel CPUs with virtualization support provide a mode called VMX Operation. In this mode, virtualization-specific instructions are enabled and the CPU behavior is modified to support virtualization. VMX Operation is further divided into two sub-modes: VMX Root Operation and VMX Non-root Operation. The VMM runs in VMX Root Operation. This mode behaves almost the same as normal operation, but adds support for VMX-specific instructions. Guests run in VMX Non-root Operation. In this mode, some privileged instructions are restricted, and executing them causes control to transfer to the VMM. This transition from VMX Non-root to VMX Root is called a VM Exit, while the reverse transition is known as a VM Entry. Collectively, these transitions are referred to as VMX Transitions. By triggering VM Exits through privileged instructions, the VMM can intervene in the guest's behavior and virtualize system resources.
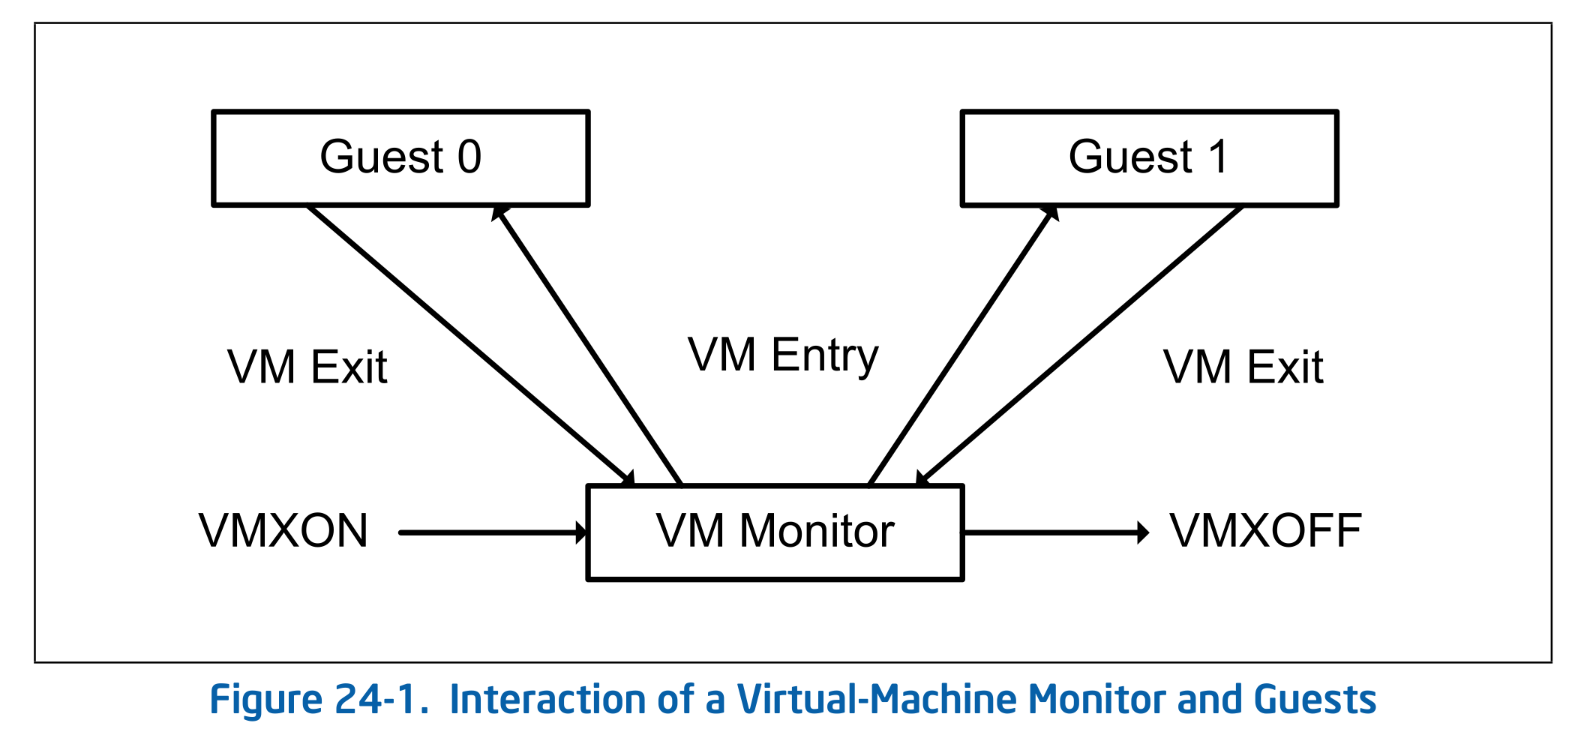 Interaction of a Virtual-Machine Monitor and Guests. SDM Vol.3C 24.4 Figure 24-1.
The Ymir Kernel enters VMX Root Operation using VMXON instruction. Conversely, it exits VMX Root Operation and returns to normal mode usingVMXOFF instruction. Once the CPU transitions into VMX Operation, it gains access to a new set of extended instructions known as VMX Instructions. Among them, VMLAUNCH and VMRESUME are used to perform VM Entry. After switching to the guest (VMX Non-root Operation), the guest's instructions are executed directly on the CPU, just like without virtualization. Since software emulation of instructions is not required, hardware virtualization with VT-x achieves better performance than software-based virtualization. When the guest executes privileged instructions or meets certain predefined conditions1, a VM Exit occurs, causing a transition back to Root Operation. The VMM handles the exit based on its cause and then uses VM Entry to resume execution in the guest.
Note that VMX Operation is a concept separate from CPU privilege rings. Even if a guest is running in Ring 0, as long as it operates in VMX Non-root Operation, it remains under the control of the VMM.
Checking VMX Support
First, we need to check whether the CPU supports VT-x. This involves the following steps:
- Check the vendor ID by CPUID instruction.
- Even within the same x64 architecture, different vendors provide different virtualization support mechanisms.
- Verify that the vendor ID is
GenuineIntel2.
- Verify that VMX is supported by CPUID instruction
- Verify that VMXON can be executed even without entering SMX Operation using CPUID instruction.
- SMX: Safer Mode Extension is a mode provided by Intel® Trusted Execution Technology. Since Ymir does not use SMX, it must be able to execute VMXON outside of SMX.
Before entering VMX Operation, we will sequentially verify that these conditions are met. From here on, all VMX-related operations will be implemented starting from ymir/vmx.zig:
const VmError = error{
    /// Memory allocation failed.
    OutOfMemory,
    /// The system does not support virtualization.
    SystemNotSupported,
    /// Unknown error.
    UnknownError,
};

pub const Vm = struct {
    const Self = @This();

    pub fn new() VmError!Self {
        // 1. Check CPU vendor.
        TODO
        // 2&3. Check if VMX is supported.
        TODO

        return Self{};
    }
};
CPUID
Before diving into VMX-related operations, let's first implement a function for CPUID instruction. CPUID is used to retrieve processor features and gather vendor-, generation-, and model-specific information.
Specify the information you want to retrieve using EAX. In some cases, ECX is also used to specify additional details. EAX is referred to as the leaf, and ECX as the subleaf. In this series, CPUID calls with leaf N and subleaf M are denoted as CPUID[N:M]. The returned values are stored across four registers: EAX, EBX, ECX, and EDX. The content of each register depends on the specified leaf and subleaf. For a comprehensive list of CPUID leaf/subleaf values, refer to SDM Vol.2A Chapter 3.3 Table 3-8.
pub const Leaf = enum(u32) {
    maximum_input = 0x0,
    vers_and_feat_info = 0x1,
    ext_feature = 0x7,
    ext_enumeration = 0xD,
    ext_func = 0x80000000,
    ext_proc_signature = 0x80000001,
    _,

    /// Convert u64 to Leaf.
    pub fn from(rax: u64) Leaf {
        return @enumFromInt(rax);
    }
    /// Issues CPUID instruction to query the leaf and sub-leaf.
    pub fn query(self: Leaf, subleaf: ?u32) CpuidRegisters {
        return cpuid(@intFromEnum(self), subleaf orelse 0);
    }
};

const CpuidRegisters = struct {
    eax: u32,
    ebx: u32,
    ecx: u32,
    edx: u32,
};

pub const FeatureInfoEcx = packed struct(u32) {
    /// ...
    _other_fields1: u5,
    /// Virtual Machine Extensions.
    vmx: bool = false,
    /// ...
    _other_fields2: u26,
};
The Leaf enum does not list all possible leaves. In fact, CPUID is infinitely extensible, so enumerating all of them is neither possible nor meaningful. Here, we only list the ones we use, and ignore the rest with _. An enum that includes _ like this is called a non-exhaustive enum. Any switch statement on a non-exhaustive enum must be a non-exhaustive switch.
We use the Leaf as following:
const result = Leaf.query(.ext_feature, 0x1);
// OR
const result = Leaf.ext_feature.query(0x1);
If a subleaf needs to be specified, it is passed as an argument to query(). If no subleaf is needed, you can pass null.
tip
In Zig, non-static methods of structs are defined like fn hoge(self: Self). There are two ways to call such methods:
const result = some_struct.hoge();
const result = SomeStruct.hoge(some_struct);
The former is simply syntactic sugar for the latter, similar to this in C++.
cpuid() is an assembly function that executes CPUID instruction. This function is not exposed externally; instead, it is accessed through the Leaf abstraction:
fn cpuid(leaf: u32, subleaf: u32) CpuidRegisters {
    var eax: u32 = undefined;
    var ebx: u32 = undefined;
    var ecx: u32 = undefined;
    var edx: u32 = undefined;

    asm volatile (
        \\mov %[leaf], %%eax
        \\mov %[subleaf], %%ecx
        \\cpuid
        \\mov %%eax, %[eax]
        \\mov %%ebx, %[ebx]
        \\mov %%ecx, %[ecx]
        \\mov %%edx, %[edx]
        : [eax] "=r" (eax),
          [ebx] "=r" (ebx),
          [ecx] "=r" (ecx),
          [edx] "=r" (edx),
        : [leaf] "r" (leaf),
          [subleaf] "r" (subleaf),
        : "rax", "rbx", "rcx", "rdx"
    );

    return .{
        .eax = eax,
        .ebx = ebx,
        .ecx = ecx,
        .edx = edx,
    };
}
MSR
Like CPUID, MSR: Model Specific Register is used to retrieve and manipulate architecture-specific features. Unlike general-purpose registers, accessing MSRs requires privilege3. Since MSRs are continuously added, we do not enumerate all of them; instead, we define only those necessary. The list below does not cover all MSRs used by Ymir - additional MSRs will be added as needed:
pub const Msr = enum(u32) {
    /// IA32_FEATURE_CONTROL MSR.
    feature_control = 0x003A,

    /// IA32_VMX_BASIC MSR.
    vmx_basic = 0x0480,

    _,
};

pub const MsrFeatureControl = packed struct(u64) {
    /// Lock bit.
    lock: bool,
    /// VMX in SMX (Safer Mode Extensions) operation.
    vmx_in_smx: bool,
    /// VMX outside SMX operation.
    vmx_outside_smx: bool,
    /// ...
    _other_fields: u61,
};
Access to MSRs is performed using RDMSR and WRMSR instructions. The MSR to access is specified via ECX register. The return value is formed by concatenating EDX and EAX in that order:
pub fn readMsr(msr: Msr) u64 {
    var eax: u32 = undefined;
    var edx: u32 = undefined;
    asm volatile (
        \\rdmsr
        : [eax] "={eax}" (eax),
          [edx] "={edx}" (edx),
        : [msr] "{ecx}" (@intFromEnum(msr)),
    );

    return bits.concat(u64, edx, eax);
}

pub fn writeMsr(msr: Msr, value: u64) void {
    asm volatile (
        \\wrmsr
        :
        : [msr] "{ecx}" (@intFromEnum(msr)),
          [eax] "{eax}" (@as(u32, @truncate(value))),
          [edx] "{edx}" (@as(u32, @truncate(value >> 32))),
    );
}
Verifying Vendor ID
The vendor ID string from step 1 can be obtained using CPUID[0] (.maximum_input):
pub fn getCpuVendorId() [12]u8 {
    var ret: [12]u8 = undefined;
    const regs = cpuid.Leaf.query(.maximum_input, null);

    for ([_]u32{ regs.ebx, regs.edx, regs.ecx }, 0..) |reg, i| {
        for (0..4) |j| {
            const b: usize = (reg >> @truncate(j * 8));
            ret[i * 4 + j] = @as(u8, @truncate(b));
        }
    }
    return ret;
}
Use Vm.new() to retrieve the vendor ID and verify that it is GenuineIntel:
const vendor = arch.getCpuVendorId();
if (!std.mem.eql(u8, vendor[0..], "GenuineIntel")) {
    log.err("Unsupported CPU vendor: {s}", .{vendor});
    return Error.SystemNotSupported;
}
Verifying VMX Support
Steps 2 and 3 are checked within the same function, isVmxSupported(). First, step 2 verifies VMX support using CPUID[1]. Step 3 checks whether VMXON can be executed outside of SMX Operation by inspecting the value of the IA32_FEATURE_CONTROL MSR:
pub fn isVmxSupported() bool {
    // Check CPUID if VMX is supported.
    const regs = cpuid.Leaf.query(.vers_and_feat_info, null);
    const ecx: cpuid.FeatureInfoEcx = @bitCast(regs.ecx);
    if (!ecx.vmx) return false;

    // Check VMXON is allowed outside SMX.
    var msr_fctl: am.MsrFeatureControl = @bitCast(am.readMsr(.feature_control));
    if (!msr_fctl.vmx_outside_smx) {
        // Enable VMX outside SMX.
        if (msr_fctl.lock) @panic("IA32_FEATURE_CONTROL is locked while VMX outside SMX is disabled");
        msr_fctl.vmx_outside_smx = true;
        msr_fctl.lock = true;
        am.writeMsr(.feature_control, @bitCast(msr_fctl));
    }
    msr_fctl = @bitCast(am.readMsr(.feature_control));
    if (!msr_fctl.vmx_outside_smx) return false;

    return true;
}
If VMXON Outside SMX is disabled, enable it by modifying the MSR. Before doing so, verify that the Lock Bit (IA32_FEATURE_CONTROL[0]) is cleared. If the lock bit is set, no writes to this MSR are allowed. Since the lock bit remains set until the system resets, if it is already set, there is no way to enable this feature. Conversely, if the lock bit is cleared, VMXON will fail, so after making the necessary changes, this function locks the MSR to prevent further modification.
The lock bit is primarily intended for the BIOS to configure and lock system-supported features. Once set by the BIOS, it usually cannot be changed by OS. If VMX Outside SMX is disabled, please check your host BIOS settings.
Call these functions in Vm.new():
if (!arch.isVmxSupported()) {
    log.err("Virtualization is not supported.", .{});
    return Error.SystemNotSupported;
}
With this, the check for VMX support is complete. Call this function in kernelMain() to verify that VMX is supported:
const vm = try vmx.Vm.new();
_ = vm;
vCPU
Entering VMX Operation means modifying the current CPU state and must be done per CPU. Although Ymir in this series supports only a single core and does not particularly require attention to this, we still define a Vcpu struct to explicitly represent the CPU-specific context:
pub const Vcpu = struct {
    const Self = @This();

    /// ID of the logical processor.
    id: usize = 0,
    /// VPID of the virtual machine.
    vpid: u16,

    pub fn new(vpid: u16) Self {
        return Self{ .vpid = vpid };
    }
};
VPID: Virtual-Processor Identifier is a unique 16-bit ID assigned to each vCPU. Similar to PCID, it is used to identify TLB entries, among other things. The id represents the logical core ID4. Since Ymir in this series supports only a single core, id is fixed at 0. When supporting SMP, this value should be changed per core.
Let's include Vcpu within the Vm struct. Again, VMX code that is highly CPU-dependent will be placed under arch/x86/vmx. If support for AMD-V is added later, branching with a switch statement can handle the differences:
const impl = switch (builtin.target.cpu.arch) {
    .x86_64 => @import("arch/x86/vmx.zig"),
    else => @compileError("Unsupported architecture."),
};

pub const Vm = struct {
    vcpu: impl.Vcpu,

    pub fn new() VmError!Self {
        ...
        // Don't use 0, this is reserved for VMX root, outside VMX operation, or for disabled VPID.
        // While it works here, it will cause issues in future chapters.
        const vcpu = impl.Vcpu.new(1);
        return Self{ .vcpu = vcpu };
    }
};
Transition to VMX Operation
Since VMX support has been confirmed, let's transition into VMX Operation. Entering VMX Operation requires configuring the CR registers and executing VMXON instruction.
Configuring Control Registers
To enter VMX Operation, CR0 and CR4 registers must be configured properly. Additionally, once inside VMX Operation, certain bits of CR0 and CR4 are fixed; attempting to modify these bits will generate a #GP: General Protection Fault.
The value of CR0 is constrained by two MSRs: IA32_VMX_CR0_FIXED0 and IA32_VMX_CR0_FIXED1. If the N-th bit of the former is 1, then CR0[N] must be set to 1. Conversely, if the N-th bit of the latter is 0, then CR0[N] must be set to 0. The same applies to CR4, which is regulated by IA32_VMX_CR4_FIXED0 and IA32_VMX_CR4_FIXED1. The indices of these MSRs are as follows:
| MSR | Address |
|---|---|
| IA32_VMX_CR0_FIXED0 | 0x486 |
| IA32_VMX_CR0_FIXED1 | 0x487 |
| IA32_VMX_CR4_FIXED0 | 0x488 |
| IA32_VMX_CR4_FIXED1 | 0x489 |
Note that only the lower 32 bits of each register are valid; the upper 32 bits should be ignored.
fn adjustControlRegisters() void {
    const vmx_cr0_fixed0: u32 = @truncate(am.readMsr(.vmx_cr0_fixed0));
    const vmx_cr0_fixed1: u32 = @truncate(am.readMsr(.vmx_cr0_fixed1));
    const vmx_cr4_fixed0: u32 = @truncate(am.readMsr(.vmx_cr4_fixed0));
    const vmx_cr4_fixed1: u32 = @truncate(am.readMsr(.vmx_cr4_fixed1));

    var cr0: u64 = @bitCast(am.readCr0());
    cr0 |= vmx_cr0_fixed0; // Mandatory 1
    cr0 &= vmx_cr0_fixed1; // Mandatory 0
    var cr4: u64 = @bitCast(am.readCr4());
    cr4 |= vmx_cr4_fixed0; // Mandatory 1
    cr4 &= vmx_cr4_fixed1; // Mandatory 0;

    am.loadCr0(cr0);
    am.loadCr4(cr4);
}
For reference, after verifying which bits are forcibly set to 0 or 1, the results on my environment are as follows:
| MSR | Bits | Description |
|---|---|---|
| IA32_VMX_CR0_FIXED0 | 10000000000000000000000000100001 | PE, NE, PG |
| IA32_VMX_CR0_FIXED1 | 11111111111111111111111111111111 | (None) |
| IA32_VMX_CR4_FIXED0 | 00000000000000000010000000000000 | VMX |
| IA32_VMX_CR4_FIXED1 | 00000000011101110010111111111111 | LA57, SMXE, Reserved, PKS |
The bits forcibly enabled are related only to paging and VMX. The bits forcibly disabled correspond to extensions like SMX and PKS, which Ymir does not use. Therefore, applying this mask poses no issues.
Here's the definition of readCr4()/loadCr4():
pub const Cr4 = packed struct(u64) {
    /// Other fields, see repository for details.
    _other_fields1: u13,
    /// Virtual machine extensions enable. (Used further down.)
    vmxe: bool,
    /// More fields, see repository for details.
    _other_fields2: u40,
};

pub inline fn readCr4() Cr4 {
    var cr4: u64 = undefined;
    asm volatile (
        \\mov %%cr4, %[cr4]
        : [cr4] "=r" (cr4),
    );
    return @bitCast(cr4);
}

pub inline fn loadCr4(cr4: anytype) void {
    asm volatile (
        \\mov %[cr4], %%cr4
        :
        : [cr4] "r" (@as(u64, @bitCast(cr4))),
    );
}
VMXON
To transition into VMX Operation, we use VMXON instruction. This instruction takes the physical address of an area called the VMXON region as an argument. The VMXON region is a memory block that the CPU may use during VMX Operation. Its internal structure and usage are mostly implementation-dependent and not something system developers need to worry about. It might not even be used internally, but that detail is irrelevant for our purposes.
The VMXON region must be page-aligned. Its required size depends on the implementation and can be obtained by checking the IA32_VMX_BASIC MSR (0x480).
pub fn readMsrVmxBasic() MsrVmxBasic {
    const val = readMsr(.vmx_basic);
    return @bitCast(val);
}

pub const MsrVmxBasic = packed struct(u64) {
    vmcs_revision_id: u31,
    _zero: u1 = 0,
    vmxon_region_size: u16,
    _reserved1: u7,
    true_control: bool,
    _reserved2: u8,
};
When allocating the VMXON region, use the retrieved size to allocate a page-aligned area:
const VmxonRegion = packed struct {
    vmcs_revision_id: u31,
    zero: u1 = 0,

    pub fn new(page_allocator: Allocator) VmxError!*align(mem.page_size) VmxonRegion {
        const size = am.readMsrVmxBasic().vmxon_region_size;
        const page = page_allocator.alloc(u8, size) catch return VmxError.OutOfMemory;
        if (@intFromPtr(page.ptr) % mem.page_size != 0) {
            return error.OutOfMemory;
        }
        @memset(page, 0);
        return @alignCast(@ptrCast(page.ptr));
    }
};
The only field that needs to be set in the VMXON region is the VMCS Revision Identifier. The VMCS is a structure used to configure the guest/VMM state and is one of the most critical components in VMX. However, explaining it here would require too much space, so it will be covered in the next chapter. For now, it is sufficient to understand that the VMCS structure's version number must also be set in the VMXON region. This ID is obtained from IA32_VMX_BASIC, just like the VMXON region size5.
inline fn getVmcsRevisionId() u31 {
    return am.readMsrVmxBasic().vmcs_revision_id;
}
Now, let's define a function to execute VMXON. After allocating the VMXON region, retrieve and set the VMCS revision ID. Since VMXON instruction requires a physical address, convert the virtual address of the VMXON region before passing it to am.vmxon().
fn vmxon(allocator: Allocator) VmxError!*VmxonRegion {
    const vmxon_region = try VmxonRegion.new(allocator);
    vmxon_region.vmcs_revision_id = getVmcsRevisionId();
    const vmxon_phys = mem.virt2phys(vmxon_region);

    try am.vmxon(vmxon_phys);

    return vmxon_region;
}
am.vmxon() is an assembly function:
const vmx = @import("vmx/common.zig");
const vmxerr = vmx.vmxtry;

pub inline fn vmxon(vmxon_region: mem.Phys) VmxError!void {
    var rflags: u64 = undefined;
    asm volatile (
        \\vmxon (%[vmxon_phys])
        \\pushf
        \\popq %[rflags]
        : [rflags] "=r" (rflags),
        : [vmxon_phys] "r" (&vmxon_region),
        : "cc", "memory"
    );
    try vmxerr(rflags);
}
VMX Instruction Error
VMX instructions, including VMXON, follow a special calling convention. The return value is stored in the RFLAGS register. A VMX instruction is considered successful if both the CF and ZF flags are cleared (i.e., set to 0). If the instruction fails, either CF or ZF will be set depending on whether an error code is available.
A failure with a valid error code is called VMfailValid, and it sets the ZF flag to 1. For a list of possible error codes, refer to SDM Vol.3C 31.4 VM INSTRUCTION ERROR NUMBERS. VMfailValid occurs only when the current logical core has a valid VMCS. Since we haven’t set up a VMCS yet, this error will not occur at this point.
A failure without an available error code is called VMfailInvalid, and it sets the CF flag to 1. This type of error occurs when a VMX instruction fails before a valid VMCS has been constructed.
Let's define a function to handle errors from VMX instructions.
pub const VmxError = error{
    VmxStatusUnavailable,
    VmxStatusAvailable,
    OutOfMemory,
};

pub fn vmxtry(rflags: u64) VmxError!void {
    const flags: arch.am.FlagsRegister = @bitCast(rflags);
    return
        if (flags.cf) VmxError.VmxStatusUnavailable
        else if (flags.zf) VmxError.VmxStatusAvailable;
}
By using this function, you can handle errors from VMX instructions by simply adding try vmxtry() at the end of calls like am.vmxon().
EFLAGS register looks like this:
pub const FlagsRegister = packed struct(u64) {
    /// Carry flag.
    cf: bool,
    /// Reserved. Must be 1.
    _reversedO: u1 = 1,
    /// Five other fields, see repository for details.
    _other_fields1: u4,
    /// Zero flag.
    zf: bool,
    /// More fields, see repository for details.
    _other_fields2: u57,

    pub fn new() FlagsRegister {
        var ret = std.mem.zeroes(FlagsRegister);
        ret._reservedO = 1;
        return ret;
    }
};
Verifying Transition into VMX Root Operation
Finally, enable VMX itself. VMX is activated by setting CR4[13] to 1. Once VMX is enabled, execute VMXON to transition into VMX Root Operation.
vmxon_region: *VmxonRegion = undefined,
...
pub fn virtualize(self: *Self, allocator: Allocator) VmxError!void {
    // Adjust control registers.
    adjustControlRegisters();

    // Set VMXE bit in CR4.
    var cr4 = am.readCr4();
    cr4.vmxe = true;
    am.loadCr4(cr4);

    // Enter VMX root operation.
    self.vmxon_region = try vmxon(allocator);
}
Call the function in Vm:
pub const Error = VmError || impl.VmxError;

pub fn init(self: *Self, allocator: Allocator) Error!void {
    try self.vcpu.virtualize(allocator);
    log.info("vCPU #{X} was created.", .{self.vcpu.id});
}
実行して最後まで処理が確認できたことを確認してみてください。 とはいっても、VMX Root Operation に遷移したということを直接的に確認する方法はありません。 とりわけ、VMX Non-root Operation にいる間に自身が VMX Operation にいるということを知る方法はありません。 これはセキュリティ的にゲストが自分が仮想化されていることを知ることがよろしくないためです。
However, there is an indirect way to confirm that you're in VMX Root Operation. Some VMX instructions can only be executed while in VMX Operation. One such example is VMLAUNCH, which is used to transition into VMX Non-root Operation. If you attempt to execute VMLAUNCH outside of VMX Root Operation, a #UD: Invalid Opcode exception will be triggered. Therefore, if you run this instruction and no exception occurs, it means you've successfully entered VMX Root Operation6.
asm volatile("vmlaunch");
Try running the instruction and verify that no exception is raised. Additionally, try executing the instruction before calling vm.init() and confirm that it triggers an exception as expected.
Summary
In this chapter, we've transitioned into VMX Root Operation. So far, the most noticeable change is simply that VMX-specific instructions are now usable. However, this transition does signify a fundamental change in the CPU's state; exciting stuff! In the next chapter, we'll dive into VMCS, the most critical configuration structure in VMX. It's no exaggeration to say that VMCS is the heart of VMX.
The causes of VM Exit will be covered in detail in a later chapter. Examples include the occurrence of exceptions, access to specific memory regions, and the passage of time as configured in advance by the VMM.
A very small number of individuals reportedly return the vendor ID GenuineIotel. Could this be a manufacturing defect?
Accessing it from any ring other than Ring-0 will cause a #GP(0).
In this series, virtual cores are referred to as vCPUs, while physical CPU cores are called logical cores or simply CPU cores.
The value stored in IA32_VMX_BASIC represents the size of VMCS rather than the VMXON region.
The VMLAUNCH instruction itself will actually fail at this stage, even after a successful VMXON. However, instead of throwing an exception, it returns an error as a VMX Instruction Error, as mentioned earlier. Since error handling for VMLAUNCH is not implemented yet, Ymir will continue to run as long as no exception is thrown.